ORM(Object Relational Mapping)은 개발자가 SQL을 직접 작성하지 않고 객체지향적으로 DB를 다룰 수 있게 해줍니다. 하지만 ORM을 처음 쓰면 거의 모두가 마주치는 문제가 있습니다. 바로 N+1 문제입니다.
저 역시 프로젝트를 진행하면서 이 문제를 겪었고, 단순한 최적화를 넘어서 실제 데이터가 많아지면 어떻게 되는지 궁금했습니다. 그래서 이번 글에서는 N+1 문제 → 로딩 전략 선택 → 실제 AWS 환경에서 간단히 실험한 결과를 공유하려 합니다.
2. N+1 문제를 직접 겪다
예제로 User(작성자) – Post(게시글) 구조를 생각해 봅시다. User와 Post는 1:N 관계로 한 유저가 여러 포스트를 작성할수 있어요.
users 테이블
id
name
1
Choi
2
Kim
3
Yim
4
Lee
posts 테이블
id
title
user_id
content
1
Hello World
1
안녕??....................
2
ORM is awesome
2
ORM 은 너무 멋지다~..........
3
N+1 problem sucks
1
N+1 뭐냐 ..........
4
SQLAlchemy Tips
3
SQLalchmey는 이렇게 사용할 수 있어요! ...
5
Python is beautiful
4
Python은 너무 아름답다 그 이유는 ...
SQLalchemy를 활용해 ORM Model은 아래처럼 만들 수 있어요.
from sqlalchemy import Column, Integer, String, Text, ForeignKey
from sqlalchemy.orm import declarative_base, relationship

Base = declarative_base()

class User(Base):
    __tablename__ = "users"

    id = Column(Integer, primary_key=True, autoincrement=True)
    name = Column(String(50), nullable=False)

    # 역참조 (User.posts 로 접근 가능)
    posts = relationship("Post", back_populates="user")


class Post(Base):
    __tablename__ = "posts"

    id = Column(Integer, primary_key=True, autoincrement=True)
    title = Column(String(200), nullable=False)
    content = Column(Text)
    user_id = Column(Integer, ForeignKey("users.id"), nullable=False)

    # User와 관계 설정 (Post.user 로 접근 가능)
    user = relationship("User", back_populates="posts")
N+1 발생 상황
모든 포스트에 대해서, 포스트 제목과 포스트를 작성한 사람의 이름을 같이 출력할 때 아래와 같이 작성할 수 있습니다. 포스트가 100개라고 가정할 때,
# N+1 발생 예시 (SQLAlchemy)
posts = session.query(Post).limit(100).all()
for post in posts:
    print(post.title, post.user.name)  # 여기서 user 접근 시마다 추가 쿼리
위 경우 실제 실행되는 SQL 쿼리문은 아래와 같아요.
SELECT * FROM posts LIMIT 100;             -- 1번
SELECT * FROM users WHERE id=1;            -- 2번
SELECT * FROM users WHERE id=2;            -- 3번
SELECT * FROM users WHERE id=3;            -- 4번
...
SELECT * FROM users WHERE id=N;          -- N+1번
총 100+1번(N+1번) 쿼리 실행 → 데이터가 늘어날수록 기하급수적으로 느려집니다. 저도 실제로 이 문제 때문에 API 응답 속도가 수십 초까지 늘어나는 경험을 했습니다.
3. 해결 방법: 로딩 전략 선택
ORM에서는 relationship을 가져올 때 다양한 로딩 전략을 선택할 수 있습니다. 대표적인 것이 두 가지입니다.
3.1 Fetch Join (joinedload)
fetch join은 JPA/Hibernate(JAVA ORM)에서 온 개념인데, join을 통해 연관된 엔티티(객체)를 미리 가져온다는 개념입니다. SQLAlchemy도 같은 개념을 차용해서 joinedload 옵션을 제공하고, 이것을 흔히 "Fetch Join"이라고 부릅니다.
from sqlalchemy.orm import joinedload

posts = (
    session.query(Post)
    .options(joinedload(Post.user))
    .limit(100)
    .all()
)

for post in posts:
    print(post.title, post.user.name)  # 여기서 user 접근 시마다 추가 쿼리 없음
위 코드는 Postgres 기준으로 아래의 SQL query문이 실행됩니다.
SELECT posts.id AS posts_id,
       posts.title AS posts_title,
       posts.content AS posts_content,
       posts.user_id AS posts_user_id,
       users_1.id AS users_1_id,
       users_1.name AS users_1_name
FROM posts
LEFT OUTER JOIN users AS users_1 ON users_1.id = posts.user_id
LIMIT 100;
즉 쿼리 1번으로 Post와 User를 JOIN 해서 모두 가져오는 의미로 Python에서 post.user.name 접근할 때 추가적으로 쿼리가 발생하지 않습니다.
Fetch Join은 쿼리 1번으로 해결되지만, 1:N 관계에서는 row 중복이 발생할 수 있습니다. 위와 달리, User 기준으로 posts를 가져올때, 아래와 같이 joinedload를 쓸수있는데요.
from sqlalchemy.orm import joinedload

users = (
    session.query(User)
    .options(joinedload(User.posts))
    .limit(100)
    .all()
)

for user in users:
    for post in user.posts:
        print(user.name, post.title)
실행되는 SQL
SELECT users.id AS users_id, users.name AS users_name,
       posts_1.id AS posts_1_id, posts_1.title AS posts_1_title, posts_1.content AS posts_1_content, posts_1.user_id AS posts_1_user_id
FROM users
LEFT OUTER JOIN posts AS posts_1 ON users.id = posts_1.user_id
LIMIT 100;
결과테이블
users.id
users.name
posts_1_id
posts_1_title
posts_1_content
posts_1_user_id
1
Choi
1
Hello World
안녕??..............
1
1
Choi
3
N+1 problem sucks
N+1 뭐냐 ..........
1
2
Kim
2
ORM is awesome
ORM 은 너무 ........
2
3
Yim
4
SQLAlchemy Tips
SQLalchmey는 ...
3
4
Lee
5
Python is beautiful
Python은 .....
4
여기서 문제는 User 데이터가 Post 수만큼 중복 포함된다는 점입니다.
Choi가 2개의 글을 썼다면 row 2개에서 Choi가 중복됨.
만약 Choi가 1만 개의 글을 썼다면, User 데이터도 1만 번 반복됨.
LIMIT 기준도 row에 적용돼서 의도한 User 개수와 맞지 않을 수 있음.
3.2 Select IN (selectinload)
위와 같이 User기준으로 Posts를 가져올때는 selectedinload를 사용하는게 더 효과적입니다.
from sqlalchemy.orm import selectinload

users = (
    session.query(User)
    .options(selectinload(User.posts))
    .limit(100)
    .all()
)

for user in users:
    for post in user.posts:
        print(user.name, post.title)
실행되는 SQL
-- 1. users 조회
SELECT users.id AS users_id, users.name AS users_name
FROM users
LIMIT 100;

-- 2. posts 조회 (IN 조건)
SELECT posts.id AS posts_id, posts.title AS posts_title, posts.user_id AS posts_user_id
FROM posts
WHERE posts.user_id IN (1, 2, 3, 4, 5);
쿼리가 2번실행되지만 User와 Post를 분리해서 전송하기 때문에 User 관련 중복데이터 전송이 없습니다.
4. 실제 AWS 환경에서의 실험
이론적으로만 이해하는 것이 아니라, 실제로 데이터가 많아지면 얼마나 성능 차이가 나는지 확인해보고 싶었습니다. 그래서 간단한 실험 환경을 AWS에 구성했습니다.
실험 환경
EC2: Ubuntu 20.04, Python 3.10
RDS: PostgreSQL, db.t3.medium
라이브러리: SQLAlchemy, psycopg2
데이터 규모:
Users: 1,000명 (고정)
Posts: 1천 → 1만 → 5만 → 10만 개까지 점진적으로 증가
4.1 실험 방법
N+1: Post를 불러온 뒤 post.user에 접근 → User 쿼리가 매번 실행됨
Fetch Join (joinedload): Post와 User를 JOIN으로 한 번에 가져옴
Select IN (selectinload): Post를 먼저 불러온 뒤, 필요한 User만 IN 조건으로 추가 조회
각 방식으로 같은 수의 Post를 조회하고, 실행 시간을 비교했습니다.
4.2 실험 결과
아래 표는 같은 Post 수를 조회했을 때 걸린 시간입니다.
Posts 수
N+1 방식
joinedload
selectinload
1,000
1.55초
0.023초
0.038초
10,000
2.73초
0.17초
0.12초
50,000
3.72초
0.77초
0.66초
100,000
6.34초
1.47초
1.50초
4.3 결과 해석
N+1
Post가 만개만 되어도 이미 2초 가까이 소요.
5만 건부터는 3초 이상 걸림
→ 작은 데이터셋에서는 눈치 못 채다가, 데이터가 늘면 성능이 폭발적으로 나빠지는 전형적인 N+1 문제.
Fetch Join
User를 JOIN해서 한 번에 가져오기 때문에 N+1보다 압도적으로 빠름.
Post 수가 늘어도 안정적으로 1초~2초 수준에서 처리 가능.
Select IN
Post를 먼저 조회하고 필요한 User를 IN 조건으로 가져오기 때문에, Fetch Join보다 쿼리 한 번이 더 많음.
하지만 User 데이터가 중복 포함되지 않아서 대량 데이터에서 더 안정적.
이번 실험에서 10만 건 기준으로 Fetch Join과 비슷한 속도를 보임
5. 마무리
이번 글에서는 ORM을 사용할 때 흔히 맞닥뜨리는 N+1 문제를 직접 재현하고, SQLAlchemy의 Fetch Join(joinedload) 과 Select IN(selectinload) 을 통해 성능이 얼마나 개선되는지 확인했습니다.
중요한 것은 “쿼리 속도 몇 초 차이”가 아니라, N+1 구조는 데이터가 커지면 절대 확장될 수 없다는 점입니다. 따라서 ORM을 쓸 때는 반드시 로딩 전략을 의식적으로 선택해야 하며, 상황에 맞는 방법을 쓰는 습관이 필요합니다.
우리 회사 플랫폼의 제품군은 크게 Label, Curate, Model, 그리고 Apps로 구성되어 있다.
고객이 업로드한 이미지나 비디오에서 Curate를 통해 데이터를 선별하고, Label에서 라벨을 붙이고, Model에서 AI 모델을 학습시켜 플랫폼 사용자는 나만의 Vision AI 모델을 손쉽게 API 형태로 사용할 수 있다.
그중 Apps는 고객이 플랫폼을 더 쉽고 유연하게 활용할 수 있도록 돕는 자동화 도구들을 제공한다.
주요 목적은 다음과 같다:
기존에 다른 라벨링 툴에서 작업한 데이터를 Superb Platform 에 업로드
(ex. YOLO, COCO, Labelme 등 다양한 어노테이션 포맷 → Superb 형식으로 자동 변환 후 플랫폼에 업로드)
이미지에서 사람 얼굴을 감지하고 자동으로 비식별화(blur)
OCR로 텍스트 영역을 자동 감지하고 바운딩 박스를 생성
즉, 고객이 “이사”오는 과정에서 겪는 여러 번거로운 과정을 자동화함으로써 onboarding을 부드럽게 만든다.
Apps는 어떻게 실행되는가?
Apps는 여러 기능들을 개별 app 형태로 제공하는 Superb Platform의 구성 요소이며, 각 app은 독립적인 컨테이너로 실행되어 Kubernetes 상에서 운영된다. 실행 흐름은 다음과 같다:
사용자가 웹 프론트를 통해 데이터를 업로드하면, 해당 파일은 S3에 저장된다.
지정된 app이 실행되어 S3의 입력 데이터를 내려받아 처리한다.
처리 결과는 다시 S3에 업로드되거나, 다운로드 링크 또는 플랫폼 내 리소스로 제공된다.
이 모든 과정은 Apps의 백엔드 서버와의 통신을 통해 상태 및 진행 상황이 관리된다.
개별 app은 다양한 개발자가 만들지만, 공통된 실행 흐름과 시스템 환경을 모두 이해해야만 동작하도록 만들고 싶지는 않았다.
AppWrapper의 목적은 앱 실행에 필요한 공통 작업들을 추상화하여, 개발자가 비즈니스 로직에만 집중할 수 있게 하는 것이었다.
하지만 이 실행 흐름은 단순해 보이는 것과 달리, 환경 설정, presigned URL 요청, 오류 처리, 결과 업로드 등을 앱마다 수작업으로 구현하면 유지보수와 품질 관리가 매우 어려워진다.
AppWrapper의 역할
Apps의 실행 흐름에는 파일 다운로드, 결과 업로드, 상태 보고 등 반복되는 작업이 필수적으로 포함된다. 이런 공통 작업을 자동으로 처리해주는 유틸리티가 바로 AppWrapper다.
AppWrapper는 클래스 데코레이터 방식으로 동작하며, 다음과 같은 실행 흐름을 관리한다:
앱 실행 전 (Pre-Processing)
앱 실행에 필요한 입력 파일 목록과 파일 저장 경로, 작업 ID 등의 실행 정보를 시스템으로부터 전달받는다.
전달받은 정보를 기반으로, 사용자가 웹에서 업로드한 파일들을 S3에서 가져와 Pod의 로컬 디렉터리에 저장한다. (정확히는 emptyDir 형태)
만약 실행 준비 중 오류가 발생하면, 해당 작업은 즉시 실패 처리되고 상태가 백엔드로 보고된다.
앱 실행 중
개발자가 작성한 process() 함수를 호출하여 실제 비즈니스 로직을 수행한다.
예를 들어 다음과 같이 간단히 작성할 수 있다:
@AppWrapper()
def process():
    # 예: YOLO 라벨 포맷을 Superb 포맷으로 변환
    return {
        "type": "download",
        "file_path": "/tmp/converted.zip"
    }

process()
실행 후 (Post-Processing)
결과의 타입이 download인 경우 → presigned PUT URL을 통해 파일 업로드 후 웹 프론트에서 사용자가 결과 파일 download 가능
결과의 타입이 link인 경우 → URL 그대로 반환
상태 업데이트 및 로그 저장 (S3에 로그 업로드 포함)
결과 포맷은 단순하지만 명확하다
이 통일된 구조 덕분에, 어떤 앱이든 동일한 방식으로 결과를 처리할 수 있다.
Case 1: type이 link인 경우
{
    "type": "link",
    "url": "특정url",
    "label": "Go to Project"
}
app의 결과물이 hyperlink인 경우
url key가 필요 (ex) platform의 특정 url)
label key는 화면에서 보여줄 내용 (ex) 아래 사진에 가장 오른쪽 “Go to Project “버튼 )
Case 2: type이 download인 경우
app의 결과물이 파일인경우
file_path key가 필요 (Pod 내부의 파일 경로)
AppWrapper의 도입 효과
항목
개선 전
개선 후
코드 중복
presigned 요청, S3 처리 반복
데코레이터로 추상화
예외 처리
앱마다 오류 처리 제각각
실패 시 상태 일괄 업데이트
로그 수집
개발자가 직접 구현
자동 S3 업로드
개발 속도
새로운 앱 추가 시 부가작업 다수
비지니스 로직만 구현하면 끝
이 구조 덕분에 앱 개발자는 “파일을 어떻게 받을지, 어디에 저장할지, 상태를 어떻게 보고할지” 같은 운영상의 디테일을 몰라도 앱 로직만 작성하면 된다.
실제 AppWrapper 데코레이터 내부는 어떻게 구현되어 있을까?
AppWrapper는 클래스지만, __call__ 메서드를 구현함으로써 함수 데코레이터처럼 동작한다. 로컬 모드와 운영 모드가 명확히 분기되어 있어 개발/운영 환경에서 모두 활용 가능하고, 예외 발생 시 즉시 로그 저장 & 상태 보고를 통해 시스템 안정성 확보한다.
class AppWrapper:
	....

	def __call__(self, func):
        def inner(*args, **kwargs):
            if self.LOCAL_MODE:
                try:
                    result = func(*args, **kwargs)
                except Exception as e:
                    logger.error(e)
                    sys.exit(1)
            else:
                try:
                    result = func(*args, **kwargs) # 비지니스 로직 함수
                except Exception as e:
                    logger.error(traceback.format_exc())

                    .....

                    if task_data["Task"]["status"] != Status.Canceled.value:
                        self.send_pod_log_to_s3() # pod 로그 s3로 전송
                        self.update_status(Status.Failed.value, str(e))

                try:
                    # 반환된 결과 포맷 유효성 검사
                    self.validate_result_format(result)

                    # 파일이 포함된 경우 업로드
                    if result["type"] == "download":
                        self.upload_file_to_s3(result)

                    # 결과를 backend에 전송
                    data = {"task_id": self.task_id, "result": result}
                    self.send_pod_log_to_s3()
                    requests.post(
                        f"{self.TOAD_HOST}/output/",
                        data=json.dumps(data),
                    )

                    # 성공 상태 업데이트
                    self.update_status(Status.Complete.value, "App completed")

                except Exception as e:
                    error_log = f"Post app failed: {e}"
                    self.update_status(Status.Failed.value, error_log)

        return inner
AppWrapper는 어떻게 활용되고 있을까?
AppWrapper는 내부 앱 개발자들이 공통으로 사용할 수 있도록 구조화되어 있으며,
별도의 설치 없이 앱 코드에서 쉽게 가져다 사용할 수 있도록 PyPI에 패키징되어 배포되어 있다.
$ pip install AppWrapper
PyPI에 공개(링크)되어 있어 누구나 설치는 가능하지만, 소스 코드는 private GitHub repository에서 관리되고 있어 내부 사용자만 직접 수정하거나 검토할 수 있다.
앱 개발자는 별도의 설정 없이 @AppWrapper 데코레이터만 붙이면, 파일 다운로드, 결과 업로드, 상태 보고, 로그 저장 등 반복되는 실행 흐름을 자동으로 처리할 수 있다.
개선 포인트와 앞으로의 방향
AppWrapper는 현재까지 수십 개의 앱에서 안정적으로 사용되며, 개별 app들의 실행 흐름에 많은 역할을 하고 있다. 하지만 실제 운영하면서 다음과 같은 개선 가능성도 보였다:
1. 단일 클래스가 너무 많은 책임을 가짐
환경 초기화, 파일 다운로드/업로드, 상태 전송, 로그 처리, 예외 핸들링 등 너무 많은 역할이 한 클래스에 몰려 있다.
SRP(Single Responsibility Principle)를 따르는 구조로 리팩토링할 필요가 있다. (예: S3Client, StatusManager, ResultValidator 등으로 분리)
2. 결과 포맷의 유효성 검사는 코드로만 정의됨
result는 dict 형식에 "type", "url" 혹은 "file_path"가 필요하지만, 이를 Pydantic 등으로 명시하지 않았다. Pydantic 기반의 result schema 도입을 통해 유효성 검사를 개선할 수 있겠다.
/* Tokenizer state */
struct tok_state {
    /* Input state; buf <= cur <= inp <= end */
    /* NB an entire line is held in the buffer */
    char *buf;          /* Input buffer, or NULL; malloc'ed if fp != NULL */
    char *cur;          /* Next character in buffer */
    char *inp;          /* End of data in buffer */
    const char *end;    /* End of input buffer if buf != NULL */
    const char *start;  /* Start of current token if not NULL */
    int done;           /* E_OK normally, E_EOF at EOF, otherwise error code */
    /* NB If done != E_OK, cur must be == inp!!! */
    FILE *fp;           /* Rest of input; NULL if tokenizing a string */
    int tabsize;        /* Tab spacing */
    int indent;         /* Current indentation index */
    int indstack[MAXINDENT];            /* Stack of indents */
    int atbol;          /* Nonzero if at begin of new line */
    int pendin;         /* Pending indents (if > 0) or dedents (if < 0) */
    const char *prompt, *nextprompt;          /* For interactive prompting */
    int lineno;         /* Current line number */
    int first_lineno;   /* First line of a single line or multi line string
                           expression (cf. issue 16806) */
    int level;          /* () [] {} Parentheses nesting level */
            /* Used to allow free continuations inside them */
    char parenstack[MAXLEVEL];
    int parenlinenostack[MAXLEVEL];
    PyObject *filename;
    /* Stuff for checking on different tab sizes */
    int altindstack[MAXINDENT];         /* Stack of alternate indents */
    /* Stuff for PEP 0263 */
    enum decoding_state decoding_state;
    int decoding_erred;         /* whether erred in decoding  */
    int read_coding_spec;       /* whether 'coding:...' has been read  */
    char *encoding;         /* Source encoding. */
    int cont_line;          /* whether we are in a continuation line. */
    const char* line_start;     /* pointer to start of current line */
    const char* multi_line_start; /* pointer to start of first line of
                                     a single line or multi line string
                                     expression (cf. issue 16806) */
    PyObject *decoding_readline; /* open(...).readline */
    PyObject *decoding_buffer;
    const char* enc;        /* Encoding for the current str. */
    char* str;
    char* input;       /* Tokenizer's newline translated copy of the string. */

    int type_comments;      /* Whether to look for type comments */

    /* async/await related fields (still needed depending on feature_version) */
    int async_hacks;     /* =1 if async/await aren't always keywords */
    int async_def;        /* =1 if tokens are inside an 'async def' body. */
    int async_def_indent; /* Indentation level of the outermost 'async def'. */
    int async_def_nl;     /* =1 if the outermost 'async def' had at least one
                             NEWLINE token after it. */
};
(2) 토크나이저 상태는 커서의 현재 위치 같은 정보를 저장 (Parser/tokenizer.h)
/* Tokenizer state */
struct tok_state {
    /* Input state; buf <= cur <= inp <= end */
    /* NB an entire line is held in the buffer */
    char *buf;          /* Input buffer, or NULL; malloc'ed if fp != NULL */
    char *cur;          /* Next character in buffer */
    char *inp;          /* End of data in buffer */
    const char *end;    /* End of input buffer if buf != NULL */
    const char *start;  /* Start of current token if not NULL */
    int done;           /* E_OK normally, E_EOF at EOF, otherwise error code */
    /* NB If done != E_OK, cur must be == inp!!! */
    FILE *fp;           /* Rest of input; NULL if tokenizing a string */
    int tabsize;        /* Tab spacing */
    int indent;         /* Current indentation index */
    int indstack[MAXINDENT];            /* Stack of indents */
    int atbol;          /* Nonzero if at begin of new line */
    int pendin;         /* Pending indents (if > 0) or dedents (if < 0) */
    const char *prompt, *nextprompt;          /* For interactive prompting */
    int lineno;         /* Current line number */
    int first_lineno;   /* First line of a single line or multi line string
                           expression (cf. issue 16806) */
    int level;          /* () [] {} Parentheses nesting level */
            /* Used to allow free continuations inside them */
    char parenstack[MAXLEVEL];
    int parenlinenostack[MAXLEVEL];
    PyObject *filename;
    /* Stuff for checking on different tab sizes */
    int altindstack[MAXINDENT];         /* Stack of alternate indents */
    /* Stuff for PEP 0263 */
    enum decoding_state decoding_state;
    int decoding_erred;         /* whether erred in decoding  */
    int read_coding_spec;       /* whether 'coding:...' has been read  */
    char *encoding;         /* Source encoding. */
    int cont_line;          /* whether we are in a continuation line. */
    const char* line_start;     /* pointer to start of current line */
    const char* multi_line_start; /* pointer to start of first line of
                                     a single line or multi line string
                                     expression (cf. issue 16806) */
    PyObject *decoding_readline; /* open(...).readline */
    PyObject *decoding_buffer;
    const char* enc;        /* Encoding for the current str. */
    char* str;
    char* input;       /* Tokenizer's newline translated copy of the string. */

    int type_comments;      /* Whether to look for type comments */

    /* async/await related fields (still needed depending on feature_version) */
    int async_hacks;     /* =1 if async/await aren't always keywords */
    int async_def;        /* =1 if tokens are inside an 'async def' body. */
    int async_def_indent; /* Indentation level of the outermost 'async def'. */
    int async_def_nl;     /* =1 if the outermost 'async def' had at least one
                             NEWLINE token after it. */
};
파서-토크나이저는 tok_get()으로 다음 토큰을 얻고 그 아이디를 파서로 전달
// Parser/tokenizer.c L1174
/* Get next token, after space stripping etc. */

static int
tok_get(struct tok_state *tok, const char **p_start, const char **p_end)
{
	int c;
	int blankline, nonascii;
	*p_start = *p_end = NULL;
	nextline:
	tok->start = NULL;
	blankline = 0;
	/* Get indentation level */
	if (tok->atbol) {
	...
	return PyToken_OneChar(c);
	}
파서는 파서 생성기 오토마타(DFA)로 CST에 노드를 추가
640줄이 넘는 tok_get()은 CPython 코드 중에서도 손꼽히게 복잡한 부분중 하나. 루프에서 토크나이저와 파서를 호출하는 과정은 아래와 같음
CST→AST로 변환하려면 PyParser_ParseFileObject()에서 반환된 CST의 루트인 node가 필요
typedef struct _node {
    short               n_type;
    char                *n_str;
    int                 n_lineno;
    int                 n_col_offset;
    int                 n_nchildren;
    struct _node        *n_child;
    int                 n_end_lineno;
    int                 n_end_col_offset;
} node;
CST는 구문, 토큰 아이디, 심벌을 모두 포함하기 때문에 컴파일러가 사용하기에는 적합하지 않음
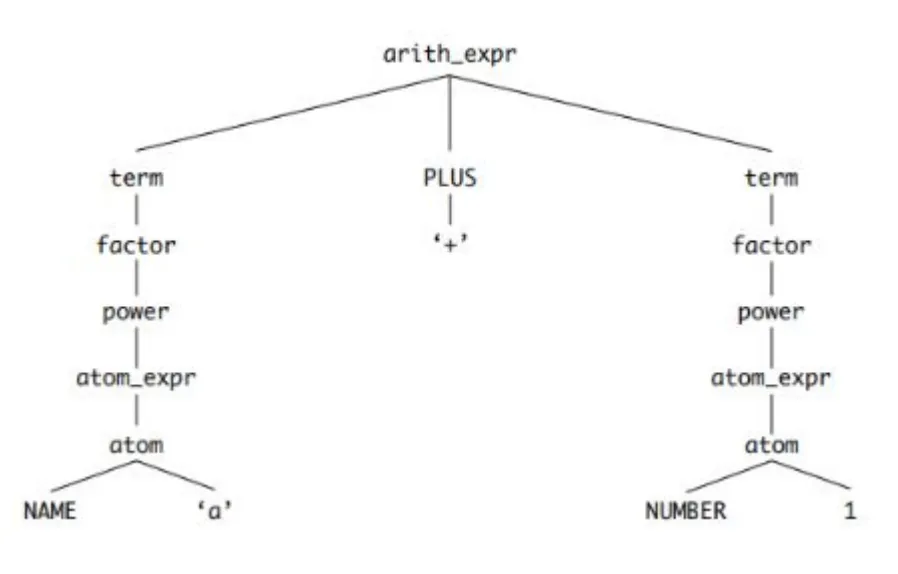
AST를 살펴보기에 앞서 파서 단계의 결과를 확인하는 방법이 있는데, parser 모듈은 C함수의 파이썬 API를 제공
>>> import parser
st<stdin>:1: DeprecationWarning: The parser module is deprecated and will be removed in future versions of Python
>>> st = parser.expr('a+1')
>>>
>>>
>>> pprint(parser.st2list(st))
[258,
 [332,
  [306,
   [310,
    [311,
     [312,
      [313,
       [316,
        [317,
         [318,
          [319,
           [320,
            [321, [322, [323, [324, [325, [1, 'a']]]]]],
            [14, '+'],
            [321, [322, [323, [324, [325, [2, '1']]]]]]]]]]]]]]]]],
 [4, ''],
 [0, '']]
Parser 모듈의 출력은 숫자형식으로 make regen-grammar 단계에서 Include/token.h파일에 저장된 코튼과 심벌의 번호와 같음
좀더 보기 쉽게 symbol과 token 모듈의 모든 번호로 딕셔너리를 만든 후 parser.st2list()의 출력을 토큰과 심벌의 이름으로 재귀적으로 바꾸면 아래와 같음
import symbol
import token
import parser
from pprint import pprint

def lex(expression):
    symbols = {v: k for k, v in symbol.__dict__.items() if isinstance(v, int)}
    tokens = {v: k for k, v in token.__dict__.items() if isinstance(v, int)}
    lexicon = {**symbols, **tokens}
    st = parser.expr(expression)
    st_list = parser.st2list(st)

    def replace(l: list):
        r = []
        for i in l:
            if isinstance(i, list):
                r.append(replace(i))
            else:
                if i in lexicon:
                    r.append(lexicon[i])
                else:
                    r.append(i)
        return r

    return replace(st_list)

pprint(lex("a + 1"))
CST는 코드 파일의 텍스트를 있는 그대로 표현하는 구조로, 텍스트로부터 토큰을 추출하여 토큰 종류만 구분해 둔 상태에 불과
CST로 기본적인 문법 구조는 알 수 있지만 함수, 스코프, 루프 같은 파이썬 언어 사양에 대한 의미를 결정할 수 없음
코드를 컴파일 하기 전 CST를 실제 파이썬 언어구조와 의미 요소를 표현하는 고수준 구조인 AST로 변환해야 함
예를 들어 AST에서 이항 연산은 표현식의 한 종류인 BinOp로 표현. 해당 표현식은 세가지 요소로 이루어짐
left: 왼쪽 항
op: 연산자(+, -, * 등)
right: 오른쪽 항
다음은 a + 1 에 대한 AST
AST는 CPython 파싱 과정 중에 생성하지만 표준 라이브러리 ast모듈을 사용해서 파이썬 코드에서 AST를 생성할 수도 있음
6.3.1 AST 연관된 소스 파일 목록
Include/python-ast.h: Parser/asdl_c.py 로 생성한 AST 노드 타입 선언
parser/Python.asdl: 도메인 특화 언어인 ASDL(abstract syntax description language) 5로 작성된 ast 노드 타입들과 프로퍼티 목록
Python/ast.c: AST 구현
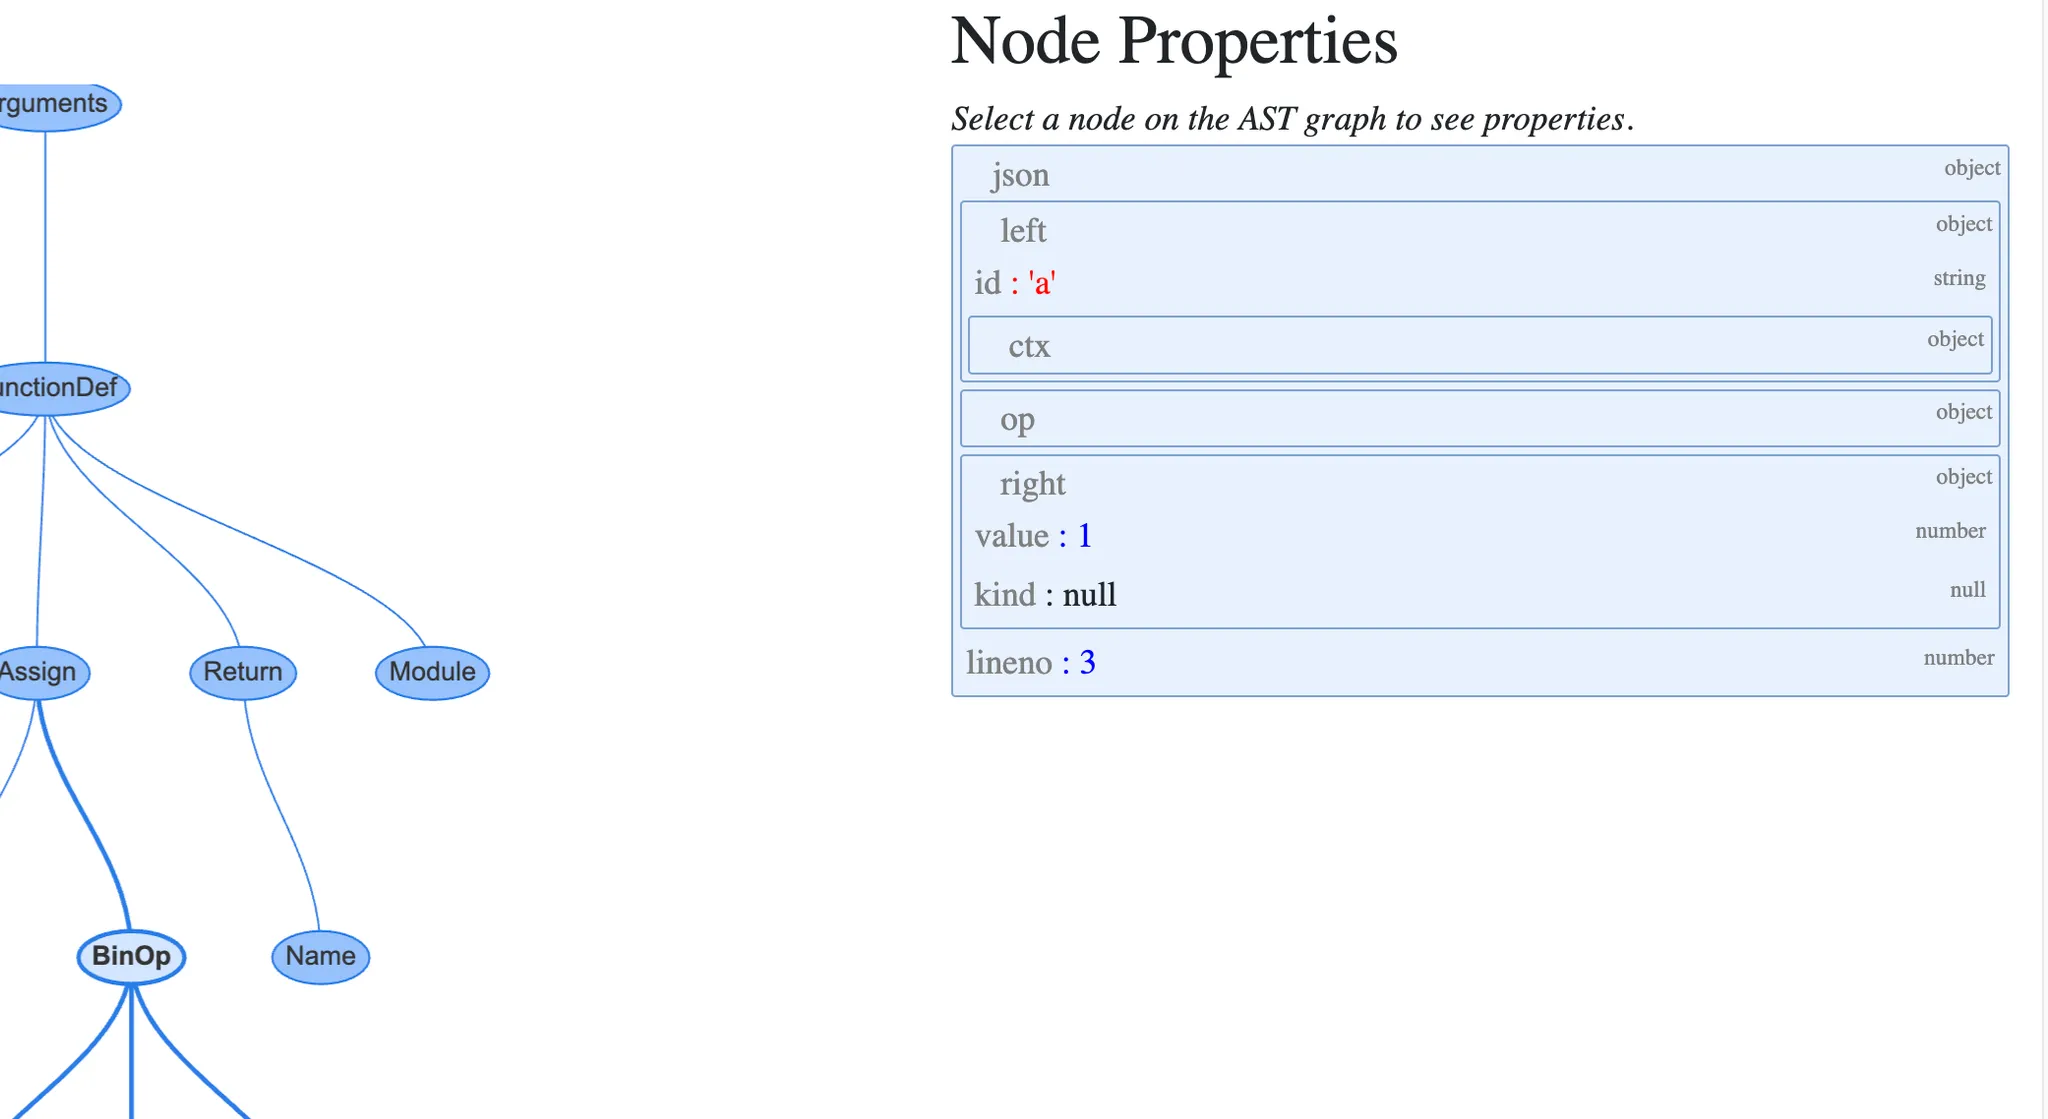
6.3.2 인스타비즈로 AST 시각화하기
$ pip install instaviz
AST와 컴파일된 코드를 웹 인터페이스로 시각화 하는 파이썬 패키지
❯ python
Python 3.9.20 (main, Sep  6 2024, 19:03:56)
[Clang 15.0.0 (clang-1500.3.9.4)] on darwin
Type "help", "copyright", "credits" or "license" for more information.
>>> import instaviz
>>> def example():
...     a = 1
...     b = a + 1
...     return b
...
>>>
>>> instaviz.show(example)
트리의 각 노드의 타입은 AST 노드 클래스
ast 모듈에서 찾을 수 있는 노드 클래스들은 모두 _ast.AST를 상속
CST와 달리, AST의 노드들은 특정 프로퍼티들을 통해 자식 노드와 연결됨
b = a + 1 이 선언된 줄과 연결된 assign 노드를 클릭하면 아래와 같음
Assign 노드는 2개의 프로퍼티를 가짐
targets는 값이 할당될 이름의 목록. 언패킹을 통해 한 번에 여러 이름에 값을 할당할 수 있기 때문에 목록이 필요
value는 이름에 할당할 값. 이 경우에 BinOp 표현식 a + 1 이 할당됨
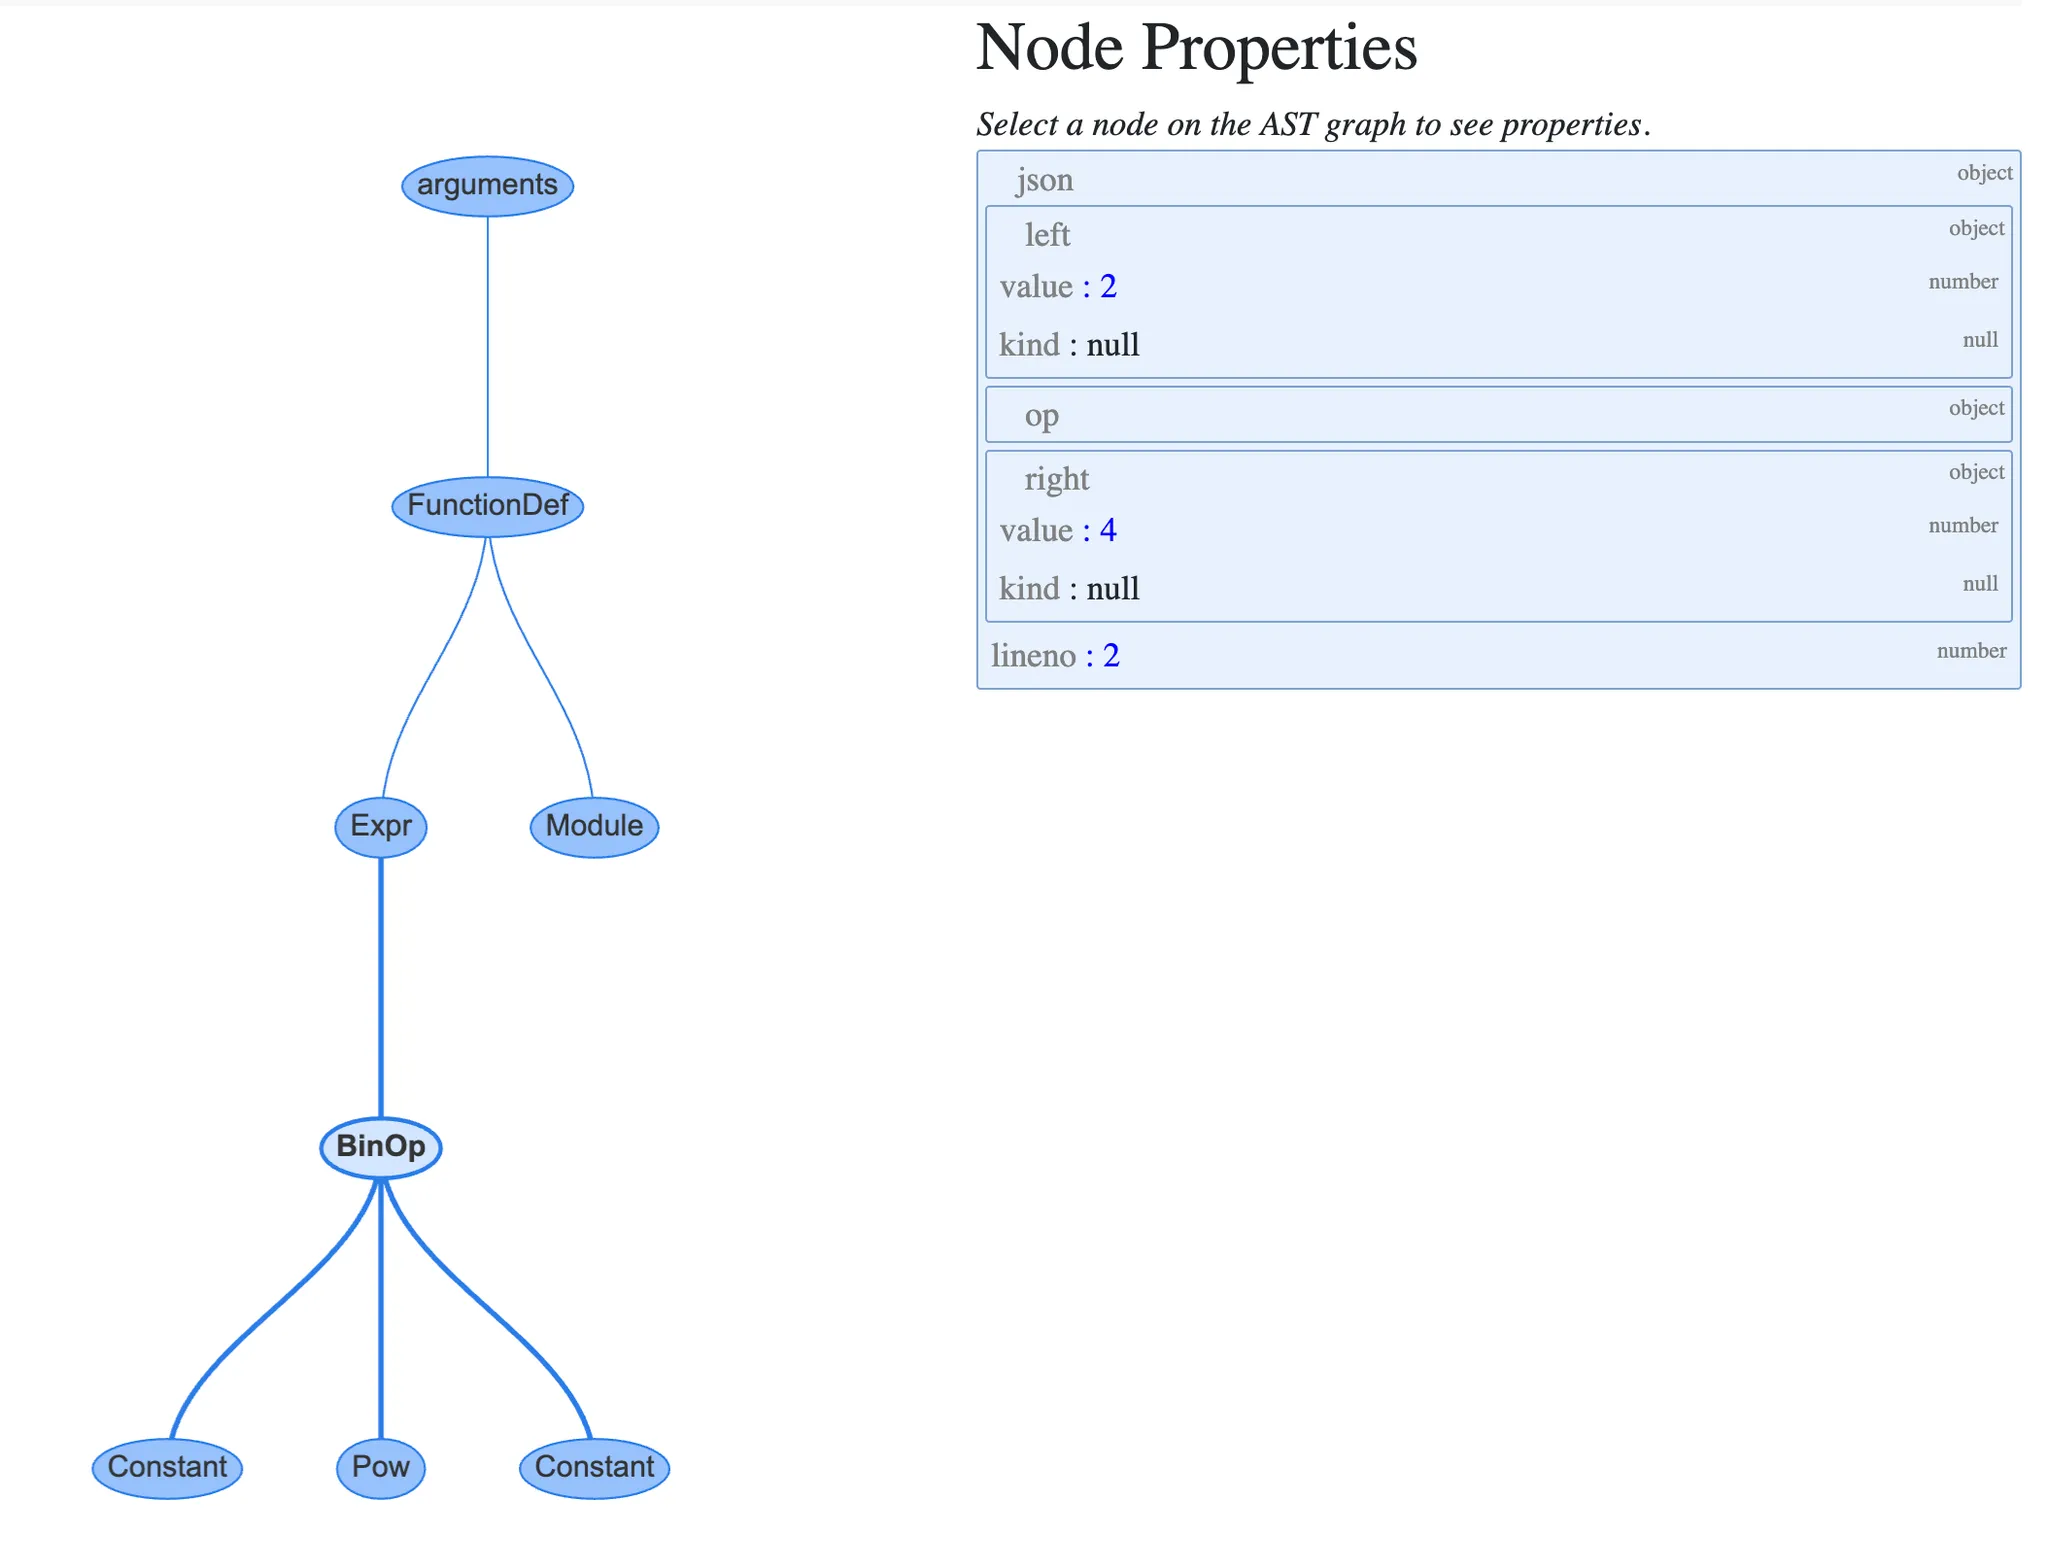
BinOp노드는 세 개의 프로퍼티를 가짐
left: 왼쪽 항
op: 연산자, 이 경우에는 더 하기를 뜻하는 Add 노드(+)
right: 오른쪽 항
6.3.3 AST 컴파일
C에서 AST를 컴파일하는 것을 매우 복잡한 작업으로 Python/ast.c 모듈은 5000줄이 넘는 코드로 이루어져 있음
AST의 공개 API는 CST와 파일 이름, 컴파일러 플래그 ,메모리 저장 영역을 인자로 받음
반환 타입은 파이썬 모듈을 표현하는 mod_ty 타입으로 Include/Python-ast.h 에서 정의
mod_ty는 아래 4가지 모듈 타입 중 하나를 담는 컨테이너 구조체
Module
Interactive
Expression
FunctionType
모듈 타입은 Parser/Python.asdl에서 정의하는데 문장, 표현식, 연산자, 컴프리헨션 타입들도 찾을 수 있음
AST가 생성하는 클래스들과 표준 라이브러리 ast 모듈의 클래스들은 Parser/Python.asdl에서 정의하는 타입들
AST는 ALMOSTEQUAL 토큰이 비교 연산자인 AlE라는 것을 아직 알 수 없어서, 토큰을 연산자로 인식할 수 있게 AST관련 C 코드를 수정
Python/ast.c의 ast_for_comp_op()로 이동해서 switch문을 찾아보면, _cmpop 열거형 값 중 하나를 반환 함
static cmpop_ty
ast_for_comp_op(struct compiling *c, const node *n)
{
    /* comp_op: '<'|'>'|'=='|'>='|'<='|'!='|'in'|'not' 'in'|'is'
               |'is' 'not'
    */
    REQ(n, comp_op);
    if (NCH(n) == 1)
    {
        n = CHILD(n, 0);
        switch (TYPE(n))
        {
        case LESS:
            return Lt;
        case GREATER:
            return Gt;
        case ALMOSTEQUAL: // 추가된 내용
            return AlE;   // 추가된 내용
        case EQEQUAL: /* == */
            return Eq;
        case LESSEQUAL:
            return LtE;
        case GREATEREQUAL:
            return GtE;
        case NOTEQUAL:
            return NotEq;
        case NAME:
            if (strcmp(STR(n), "in") == 0)
                return In;
            if (strcmp(STR(n), "is") == 0)
                return Is;
            /* fall through */
이제 토크나이저와 AST모두 코드를 파싱할 수 있지만 컴파일러는 아직 이 연산자를 실행하는 방법을 모름
AST로 거의 같음 연산자를 아래와 같이 확인해볼 수 있음
import ast
m = ast.parse('1 ~= 2')
m.body[0].value.ops[0]
<_ast.AlE object at 0x111111>
일반적으로 누락된 파라미터를 기본 값으로 바꾸어도 큰 문제가 없지만 오류가 있는 데이터를 유사한 값으로 대체하는 것을 더 위험하여 일부 오류를 숨겨버릴 수 있음
예외처리
어떤 경우에는 잘못된 데이터를 사용하여 계속 실행하는 것보다는 차라리 실행을 멈추는 것이 더 좋을 수 있음
입력이 잘못되었을 때만 함수에 문제가 생기는 것이 아님 (외부 컴포넌트에 연결되어 있는 경우)
이런 경우에는 함수 자체의 문제가 아니기 때문에 적절하게 인터페이스를 설계하면 쉽게 디버깅 할 수 있음
⇒ 예외적인 상황을 명확하게 알려주고 원래의 비즈니스 로직에 따라 흐름을 유지하는 것이 중요
정상적인 시나리오나 비즈니스 로직을 예외처리하려고 하면 프로그램의 흐름을 읽기가 어려워짐
→ 예외를 go-to문처럼 사용하는 것과 같다. 올바른 위치에서 추상화를 하지 못하게 되고 로직을 캡슐화하지도 못하게 됨.
마지막으로 예외를 대게 호출자에게 잘못을 알려주는 것으로 캡슐화를 약화시키기 때문에 신중하게 사용해야 함→이는 함수가 너무 많은 책임을 가지고 있다는 것을 의미할 수도 있음. 함수에서 너무 많은 예외를 발생시켜야 한다면 여러개의 작은 기능으로 나눌 수 있는지 검토해야 함
올바른 수준의 추상화 단계에서 예외 처리
예외는 오직 한가지 일을 하는 함수의 한 부분이어야 함
서로 다른 수준의 추상화를 혼합하는 예제. deliver_event 메소드를 중점적으로 살펴보면
import logging
import time

logger = logging.getLogger(__name__)

class DataTransport:
    """다른 레벨에서 예외를 처리하는 객체의 예"""

    _RETRY_BACKOFF: int = 5
    _RETRY_TIMES: int = 3

    def __init__(self, connector):
        self._connector = connector
        self.connection = None

    def deliver_event(self, event):
        try:
            self.connect()
            data = event.decode()
            self.send(data)
        except ConnectionError as e:
            logger.info("커넥션 오류 발견: %s", e)
            raise
        except ValueError as e:
            logger.error("%r 이벤트에 잘못된 데이터 포함: %s", event, e)
            raise

    def connect(self):
        for _ in range(self._RETRY_TIMES):
            try:
                self.connection = self._connector.connect()
            except ConnectionError as e:
                logger.info("%s: 새로운 커넥션 시도 %is", e, self._RETRY_BACKOFF)
                time.sleep(self._RETRY_BACKOFF)
            else:
                return self.connection
        raise ConnectionError(f"연결실패 재시도 횟수 {self._RETRY_TIMES} times")

    def send(self, data):
        return self.connection.send(data)
    def deliver_event(self, event):
        try:
            self.connect()
            data = event.decode()
            self.send(data)
        except ConnectionError as e:
            logger.info("커넥션 오류 발견: %s", e)
            raise
        except ValueError as e:
            logger.error("%r 이벤트에 잘못된 데이터 포함: %s", event, e)
            raise
ConnectionError와 ValueError는 별로 관계가 없음
매우 다른 유형의 오류를 살펴봄으로써 책임을 어떻게 분산해야 하는지에 대한 아이디어를 얻을 수 있음
ConnectionError는 connect 메소드 내에서 처리되어야 함. 이렇게 하면 행동을 명확하게 분리할 수 있다. 메소드가 재시도를 지원하는 경우 메소드 내에서 예외처리를 할 수 있음
ValueError는 event의 decode 메소드에 속한 에러로 event를 send 메소드에 파라미터로 전달 후 send 메소드 내에서 예외처리를 할 수 있음
위 내용처럼 구현을 수정하면 deliver_event 메소드에서 예외를 catch할 필요가 없음
def connect_with_retry(connector, retry_n_times: int, retry_backoff: int = 5):
    """<connector>를 사용해 연결을 시도함.
    연결에 실패할 경우 <retry_n_times>회 만큼 재시도
    재시도 사이에는 <retry_backoff>초 만큼 대기

    연결에 성공하면 connection 객체를 반환
    재시도 횟수를 초과하여 연결에 실패하면 ConnectionError 오류 발생

    :param connector: connect() 메소드를 가진 객체
    :param retry_n_times: 연결 재시도 횟수
    :param retry_backoff: 재시도 사이의 대기 시간(초)

    """
    for _ in range(retry_n_times):
        try:
            return connector.connect()
        except ConnectionError as e:
            logger.info("%s: 새로운 커넥션 시도 %is", e, retry_backoff)
            time.sleep(retry_backoff)

    exc = ConnectionError(f"연결 실패 ({retry_n_times}회 재시도)")
    logger.exception(exc)
    raise exc
class DataTransport:
    """추상화 수준에 따른 예외 분리를 한 객체"""

    _RETRY_BACKOFF: int = 5
    _RETRY_TIMES: int = 3

    def __init__(self, connector: Connector) -> None:
        self._connector = connector
        self.connection = None

    def deliver_event(self, event: Event):
        self.connection = connect_with_retry(
            self._connector, self._RETRY_TIMES, self._RETRY_BACKOFF
        )
        self.send(event)

    def send(self, event: Event):
        try:
            return self.connection.send(event.decode())
        except ValueError as e:
            logger.error("%r contains incorrect data: %s", event, e)
            raise
deliver_event 메소드 내에서 예외 catch 하는 부분 없어짐
엔드 유저에게 Traceback 노출 금지
보안을 위한 고려사항으로 예외가 전파되도록하는 경우는 중요한 정보를 공개하지 않고 “알 수 없는 문제가 발생했습니다” 또는 “페이지를 찾을 수 없습니다”와 같은 일반적인 메세지를 사용해야 함
비어있는 except 블록 지양
파이썬의 안티패턴 중 가장 악마같은 패턴(REAL 01)으로 어떠한 예외도 발견할 수 업슨 문제점이 있음
명시적으로 해당 오류를 무시하려면 contextlib.suppress 함수를 사용하는 것이 올바른 방법
import contextlib

with contextlib.suppress(KeyError):
    process_data()
원본 예외 포함
raise <e> from <original_exception> 구문을 사용하면 여러 예외를 연결할 수 있음
원본 오류의 traceback 정보가 새로운 exception에 포함되고 원본 오류는 새로운 오류의 원인으로 분류되어 cause 속성에 할당 됨
class InternalDataError(Exception):
    """업무 도메인 데이터의 예외"""

def process(data_dictionary, record_id):
    try:
        return data_dictionary[record_id]
    except KeyError as e:
        raise InternalDataError("데이터가 존재하지 않음") from e

test_dict = {"a": 1}

process(test_dict, "b")
Traceback (most recent call last): File "/Users/woo-seongchoi/Desktop/CleanCode/ch3/main.py", line 7, in process return data_dictionary[record_id] ~~~~~~~~~~~~~~~^^^^^^^^^^^ KeyError: 'b'*
The above exception was the direct cause of the following exception: Traceback (most recent call last): File "/Users/woo-seongchoi/Desktop/CleanCode/ch3/main.py", line 14, in <module> process(test_dict, "b") File "/Users/woo-seongchoi/Desktop/CleanCode/ch3/main.py", line 9, in process raise InternalDataError("데이터가 존재하지 않음") from e InternalDataError: 데이터가 존재하지 않음*
파이썬에서 assertion 사용하기
절대로 일어나지 않아야 하는 상황에 사용되므로 assert 문에 사용된 표현식을 불가능한 조건을 의미로 프로그램을 중단시키는 것이 좋다
try:
    assert condition.holds(), "조건에 맞지 않음"
except AssertionError:
    alternative_procedure() # catch 후에도 계속 프로그램을 실행하면 안됨
위 코드가 나쁜 또 다른 이유는 AssertionError를 처리하는 것 이외에 assertion 문장이 함수라는 것
assert condition.holds(), "조건에 맞지 않음"
함수 호출은 부작용을 가질 수 있으며 항상 반복가능하지 않음. 또한 디버거를 사용해 해당 라인에서 중지하여 오류 결과를 편리하게 볼 수 없으며 다시 함수를 호출한다 하더라도 잘못된 값이었는지 알 수 없음
result = condition.holds()
assert result > 0, f"Error with {result}"